Total: €0,00
Taxes and shipping calculated at checkout

A composite deck only remains sleek, stable, and low-maintenance if its foundation is sound. Preparing the deck sub-base is therefore not just a preliminary detail, but the step that determines whether your terrace will look good for years to come. A beautiful deck board cannot compensate for subsidence, pooling water, or a flimsy construction. With a flat, well-draining sub-base, you give your outdoor space exactly the modern finish you envision.
Don't start by digging, but by measuring. First, determine the desired height of the finished terrace, including the foundation, joists, and deck boards. Take into account the threshold of the house, outward-opening doors, and any height differences in the garden. This prevents a door from scraping over the boards or the terrace from ending up unnecessarily high.
Then, plan the drainage. Rainwater should always be able to drain away from the facade. Calculate a slight slope of approximately 1 to 2 cm per meter in the direction of the garden or a drainage zone. This difference is barely visible, but prevents water from standing against the house.
The laying direction of the boards is also relevant now. Boards laid lengthwise in the garden often make a narrow outdoor space appear longer. If you lay them parallel to the facade, a calmer and wider appearance is created. Choose the direction before you set out the joists, as the joists must be perpendicular to the boards.
Not every sub-base requires the same approach. The best foundation depends on the soil, the desired height, and the load on the terrace. A terrace near a house with a permanent dining table requires something different than a low deck path at the back of the garden.
On stable sandy soil, an excavated and compacted base of mixed granular material or broken rubble works excellently. Generally, excavate 15 to 25 cm, depending on the build-up height and the stability of the soil. Remove roots, loose soil, and organic material. This material decomposes, which can cause the sub-base to settle later.
Then, apply the foundation layer in sections and compact each layer thoroughly with a vibratory plate. Simply pouring a loose layer is not enough. Compacting provides load-bearing capacity and limits subsidence, especially for heavily used terraces.
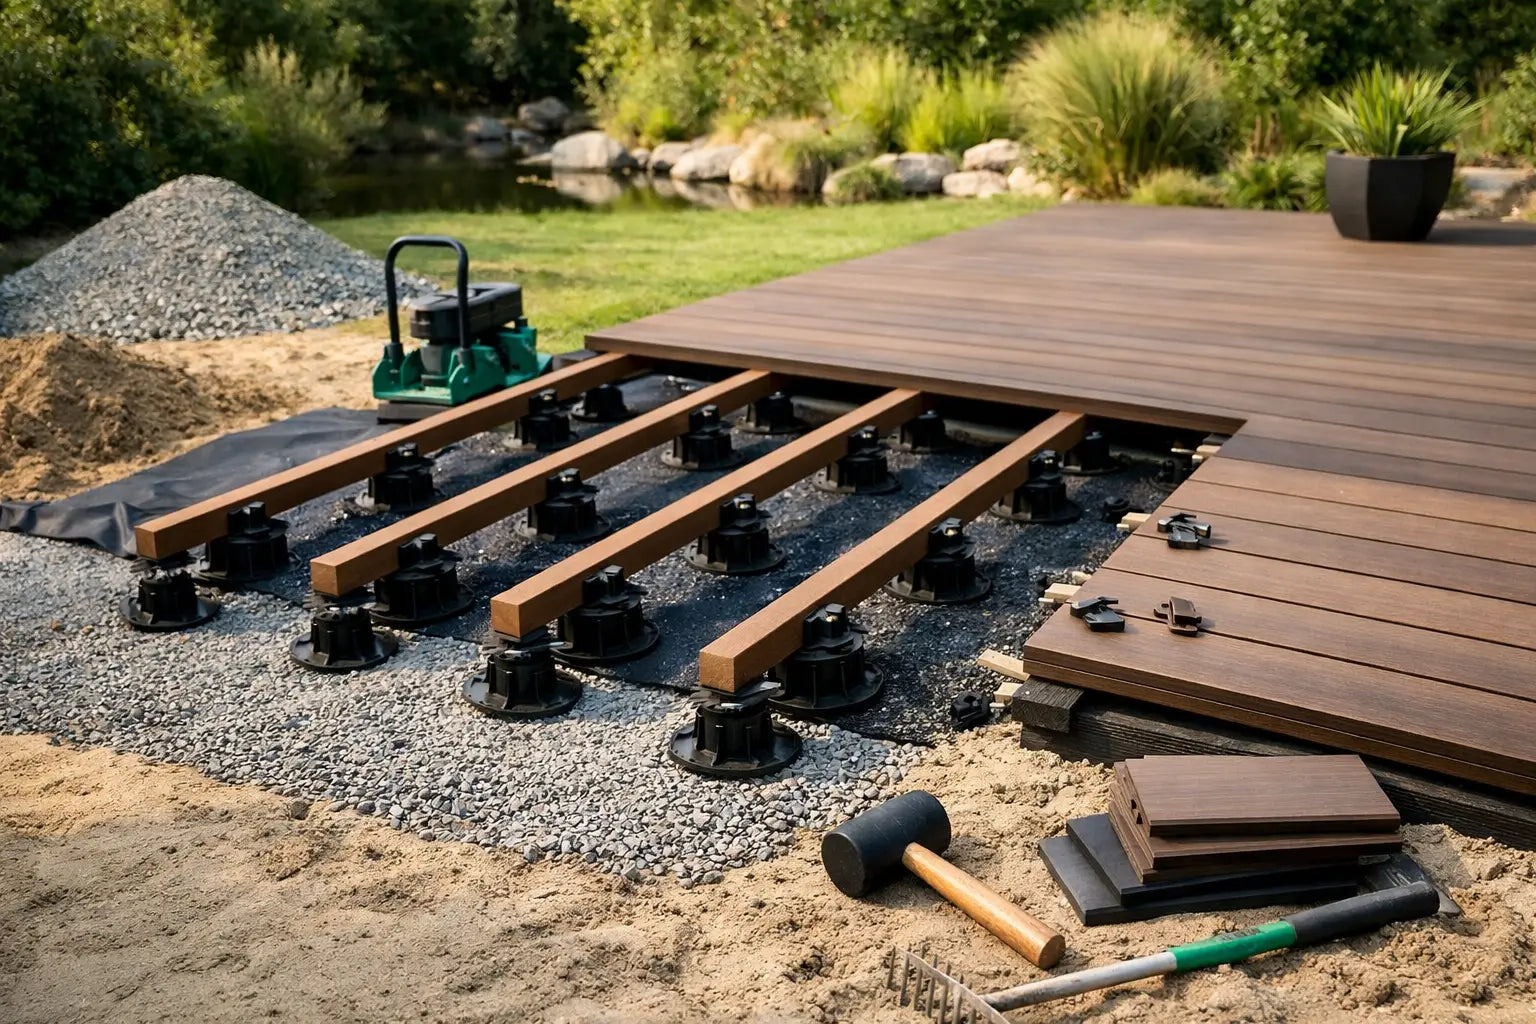
Soft soil moves more and retains moisture longer. In that case, a thicker, well-compacted foundation layer is advisable. A weed control fabric between the excavated soil and the granular material helps to keep soil and foundation material separate. This improves drainage and slows down weed growth through the construction.
For very soft soil or a terrace with heavy loads, concrete tiles, kerb stones, or foundation piers are a more reliable choice than granular material alone. The investment at the bottom pays off in a sleek deck that does not need to be re-adjusted after one winter.
A flat concrete floor or sturdy paved terrace can be a good sub-base, provided it has sufficient slope and can drain water. Check for cracks, loose parts, and areas where water collects. Do not place the joists directly on a wet sub-base. Use rubber tile supports, adjustable feet, or spacers so that moisture can drain away and the structure can ventilate.
It is tempting to install directly on existing paving. Only do so if the tiles are stable. Loose or sunken paving will continue to move, and that movement will eventually be reflected in your deck.
A composite terrace is resistant to moisture, but the supporting structure and the sub-base need space to dry. Therefore, ensure a water-permeable construction. Water that remains under a deck increases the risk of algae, dirt, and a less fresh outdoor space.
After excavating, first apply weed control fabric. Let the fabric extend slightly upwards at the edges and overlap generously. Then, the foundation layer of broken rubble or mixed granular material follows. Do not use fine, dense soil as infill. This will trap the water.
Finish the base with a flat layer on which you can place tile supports, concrete tiles, or piers. Continuously check with a long spirit level or laser. A small deviation at the bottom will become a visible height difference at the top of the deck.
The joists of a composite deck must rest on sufficient support points. Do not let them span long distances freely. The exact center-to-center distance depends on the chosen deck system, the thickness of the joist, and the expected load. Therefore, always follow the installation instructions for the relevant boards and accessories.
Common support points include concrete tiles, kerb stones, foundation piers, and adjustable terrace supports. Tiles are practical for low terraces on a compacted base. Adjustable supports offer an additional advantage if you want to work precisely in height or if the sub-base has slight differences.
Set out the support points in a regular grid. Measure the diagonals of your terrace to check if the corners are square. This check takes a few minutes and prevents you from working with skewed boards or narrow filler pieces at the end of the installation.
Never lay composite joists directly in sand, soil, or stagnant water. Ensure they are freely placed on the support points and that water can drain away from under the joists. Where necessary, place rubber strips between the support point and the joist. This dampens contact noise, protects the structure, and helps to absorb small differences.
Keep sufficient free space around the deck near facades, fences, walls, and fixed elements. Composite moves slightly due to temperature differences. This movement needs room, without boards pressing against an edge or bulging.
The distance between the joists is essential. If it is too wide, the boards can sag under load. If the joists are too close together, you use unnecessary material and time. So, do not choose by feel, but work according to the recommended dimensions of your deck boards.
When the joists are in place, it's time for a final technical check. Walk over the structure and see if everything feels stable. Check the slope with a spirit level and, if necessary, pour a small amount of water on critical spots. If it drains away neatly, the base is ready for installation.
Also, pay attention to ventilation. A low deck directly against a closed edge can retain moisture. For a raised terrace, a neat finish on the side is attractive, but always leave enough openings for air circulation and water drainage. A sleek design only works long-term if the structure can breathe.
Most problems with a deck do not arise from the boards, but from too quick a preparation. Especially avoid these four mistakes:
A flat terrace on stable sandy soil is well within the capabilities of many DIY enthusiasts. If the deck is high, borders a house with complex drainage, or the garden is on soft ground, then professional installation is often the smartest choice. This also applies to large terraces, roof terraces, and projects where multiple materials come together.
For professionals, the main advantage lies in a fixed working method: measuring, compacting the sub-base, aligning support points, and only then installing the joists. This sequence increases installation speed and delivers a result that your customer will enjoy for years.
With durable composite boards and a correctly constructed sub-base, you create a terrace that not only looks sleek on the first day, but also remains reliable after seasons of rain, sun, and intensive use. Therefore, take your time for the foundation - that's where the comfort of your outdoor space begins.